10 Easy Steps to Adjust Brakes on a Road Bike
Are you tired of struggling with your road bike’s braking performance? Many cyclists find it frustrating when their brakes don’t respond as quickly or smoothly as they’d like. Don’t worry—you’re not alone.
Adjusting your bike’s brakes can seem tricky at first, but with a little know-how, you can keep your stopping power reliable and sharp.
To adjust your road bike brakes, start by inspecting the entire system for wear or damage. Loosen the caliper bolts to align the pads properly near the rim. Center the brake pads for even contact and guarantee a small gap when the lever is released.
Tension the brake cable for responsive stopping, then fine-tune caliper position and pad alignment. Test your brakes and make final tweaks.
For long-term performance, check cables regularly, and if needed, replace or lubricate them. Keep these steps in mind for reliable stopping power.
Key Takeaways
- Check the brake lever feel and cable tension. Use the barrel adjuster to make small tweaks so the brakes respond nicely when you squeeze the lever.
- Look at your brake pads for wear. If they’re getting thin, replace them. Make sure they touch the rim evenly on both sides for consistent braking.
- Loosen the caliper bolts a bit. Then, realign the caliper and center the brake pads so they hit the rim properly. This helps your brakes work smoothly.
- Keep a gap of about 1 to 2 mm between the pads and the rim when you release the brake lever. This ensures there’s no rubbing when you’re not braking.
- Finally, test your brakes. Squeeze the levers a few times and go for a gentle ride. Make sure the stopping power feels smooth and effective.
Inspect Your Bike’s Brake System Before Adjusting
Before you start adjusting your brakes, it’s really important to inspect the entire brake system first.
Check the brake levers to make sure they move smoothly and feel firm when you squeeze them.
Look at the brake cables for any fraying, rust, or corrosion, and replace them if needed.
Check brake cables regularly for fraying, rust, or corrosion and replace if necessary to ensure safety.
Next, examine the brake pads; if they’re worn down close to the metal or unevenly worn, it’s time to replace them.
Make sure the brake calipers are aligned correctly and move freely without sticking.
Inspect the rims or rotors for dirt, debris, or damage, as these can impact how well your brakes work.
Finally, confirm that all bolts and mounting points are tight and secure.
A careful inspection like this helps catch issues early so your brakes will work safely and effectively when you ride.
Loosen Brake Caliper Bolts for Proper Pad Alignment
To ensure your brake pads line up correctly with the rim or rotor, start by loosening the brake caliper bolts. This lets the caliper move freely so you can control the pad positioning.
Use an Allen wrench or socket to loosen the bolts just enough to free the caliper without taking them out. Gently wiggle the caliper to adjust its position, making sure the pads are close but not touching the rim or rotor.
Check that the pads are evenly spaced from the braking surface on both sides. Once everything looks good, tighten the bolts securely to lock the caliper in place.
Be careful not to overtighten, as that could restrict caliper movement. This process helps you get the pads properly positioned before centering them for even contact.
Center the Brake Pads for Even Contact
Once the brake caliper is loosely positioned, you can center the brake pads to check if they make even contact with the rim or rotor. Look at how the pad touches the braking surface. If one side sticks out more than the other, gently loosen the caliper bolts just enough to shift the pad.
Carefully move the pad inward or outward so it sits evenly on the rim or rotor. Make sure the pad’s face is aligned straight with the braking surface, not tilted. When you’re happy with the position, tighten the caliper bolts firmly.
Check from different angles to ensure the pad contacts evenly across the entire surface. Proper centering guarantees smooth, effective braking and helps prevent uneven pad wear over time.
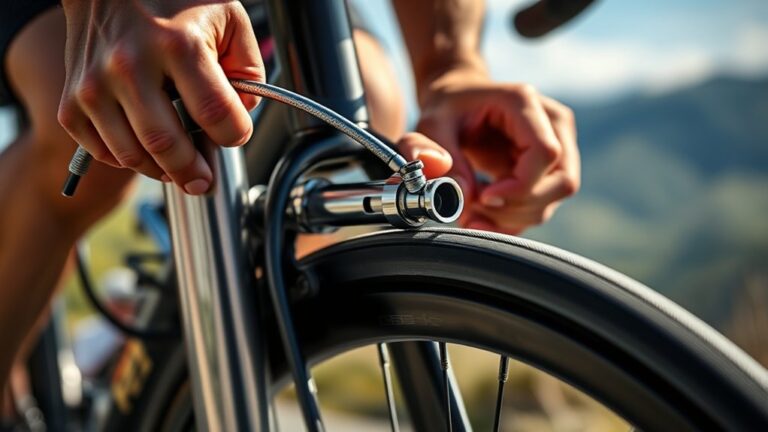
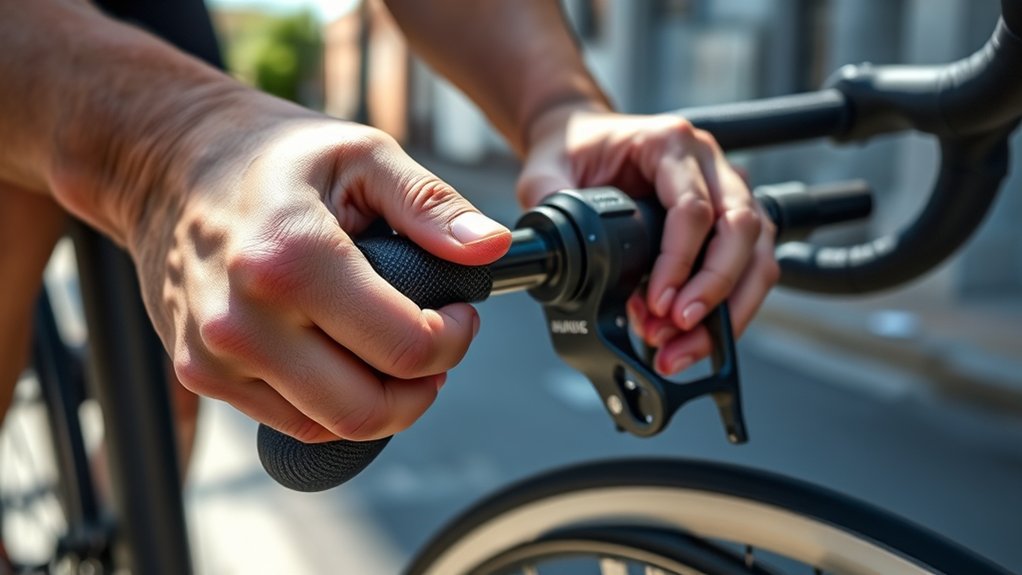
Adjust Brake Cable Tension for Responsive Stopping
Start by checking the cable slack; it should be just enough to allow smooth movement without too much play.
If the brake feels loose or unresponsive, use the barrel adjuster to tighten or loosen the tension.
Fine-tuning this component guarantees your brakes respond quickly and effectively when you need to stop.
Check Cable Slack
Before you start riding, it’s important to check the cable slack to make sure your brakes respond quickly and effectively. Proper cable slack means the brake lever doesn’t pull too far before the brakes engage.
To check, squeeze the brake lever firmly. There should be a slight, consistent give. Then, look at the distance between the lever and handlebars—it should be about 1-2 centimeters.
Next, inspect the cable tension at the brake caliper. There should be minimal slack. If the slack is too much, tighten the cable by adjusting the bolt or barrel adjuster.
Make sure the lever feels firm but not overly tight. Keeping the right cable slack improves brake responsiveness and control, making your ride safer and more efficient.
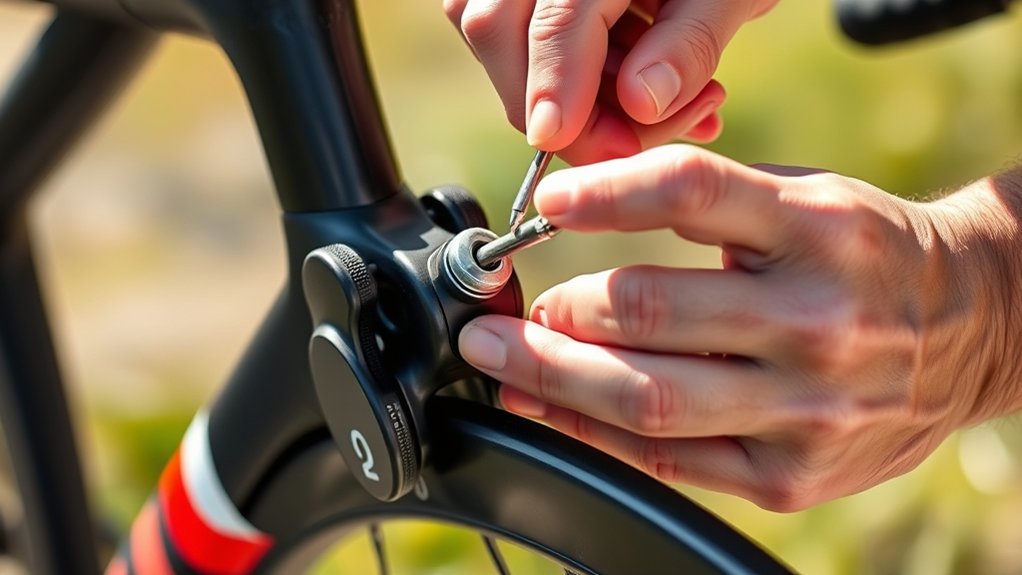
Fine-Tune Barrel Adjuster
To fine-tune the barrel adjuster, turn it clockwise to tighten the cable or counterclockwise to loosen it. This helps your brakes respond quickly when you squeeze the lever. Small adjustments can make a big difference in stopping power and safety.
As you turn the adjuster, you’ll feel the tension change. It gets your brake response closer to perfect. Remember, a well-adjusted barrel adjuster means less hand fatigue and more confident control.
| Tension Level | Brake Response | Rider Confidence |
|---|---|---|
| Too loose | Sluggish stops | Uncertain grip |
| Slightly loose | Better control | Increased safety |
| Just right | Responsive stops | Confident ride |
| Slightly tight | Firm grip | Smooth braking |
| Too tight | Excessive pull | Risk of brake damage |
Fine-Tune Caliper Position for Consistent Pad Contact
Start by checking the caliper alignment to make sure the pads sit evenly against the rim. If it’s not aligned, loosen the mounting bolts a bit.
Reposition the caliper as needed, then tighten the bolts securely. This small adjustment helps keep the pad contact consistent.
Doing this will improve your braking performance and make your ride smoother.
Check Caliper Alignment
Ensuring your calipers are properly aligned is key for consistent brake performance. When they’re aligned correctly, you’ll get even pad contact, less squealing, and better stopping power.
To check the alignment, start by removing the wheel and visually inspecting how the caliper sits relative to the rim. Then, squeeze the brake lever gently and watch how the pads contact the rim.
Next, loosen the caliper mounting bolts slightly. Realign the caliper so the pads sit evenly on the rim. Once it’s in the right position, tighten the bolts while keeping the caliper aligned.
Finally, recheck the pad contact to make sure they don’t touch the tire or hang unevenly on the rim. Repeat these steps until the caliper is centered and the pads contact the rim evenly for the best braking.
Loosen and Reposition
Loosening the caliper bolts slightly lets you shift the caliper into the best position for even pad contact. This adjustment makes sure the brake pads press evenly against the rim, which improves braking performance.
When repositioning, make sure the caliper is centered over the wheel. Use the table below to understand common caliper positions:
| Position | Effect on Braking | Common Issue |
|---|---|---|
| Centered over rim | Even pad contact | Uneven wear or squealing |
| Slightly to one side | Better pad clearance | Reduced braking efficiency |
| Too close to rim | Better grip, less pad wear | Rim contact or rubbing |
| Too far from rim | Less effective braking | Increased stopping distance |
Adjust carefully for the best contact, then tighten the bolts securely.
Tighten Bolts Securely
Once you’ve positioned the caliper correctly, it’s important to tighten the bolts securely so it stays in place during braking. Proper tightening ensures consistent pad contact and reliable stopping power.
To do this effectively, use a torque wrench to tighten the bolts to the manufacturer’s specified torque. Tighten each bolt gradually, alternating sides to apply even pressure.
Check that the caliper stays properly aligned as you tighten. Afterward, revisit the bolts after a short ride to make sure they haven’t loosened.
This method prevents caliper movement, maintains peak brake function, and helps the components last longer. Be careful not to overtighten, which can damage threads, or undertighten, which can cause misalignment.
Secure bolts are key to safe, effective braking.
Check and Correct Brake Pad Alignment and Clearance
Before adjusting your brake pads, it’s important to check their alignment and clearance to guarantee effective braking. First, spin your wheel and watch how the pads contact the rim.
The pads should hit the rim evenly and sit centered without touching the tire or staying too far away. If they’re misaligned, loosen the mounting bolts and gently reposition the pads so they sit flat against the rim’s surface.
Make sure there’s a small gap—about 1-2 mm—between the pads and the rim when your brake lever is released. Check both sides to ensure they’re symmetrical.
Proper clearance prevents rubbing and ensures quick, responsive braking. Once everything looks good and is spaced correctly, tighten the bolts securely.
This creates a solid foundation for effective braking performance.
Test Your Brakes and Make Final Adjustments
Now it’s time to test your brakes and make any final tweaks. Squeeze the brake levers firmly to check how they respond and make sure they engage smoothly.
If needed, fine-tune the brake pads for better stopping power and a more consistent feel.
Check Brake Response
How can you be sure your brakes are working properly? First, test the response by squeezing the brake levers firmly. Then, follow these steps:
- Make sure the brake pads fully engage the rim without requiring too much lever travel.
- Check that there’s no slipping or squeaking when you apply pressure.
- Ensure the brake lever feels firm and doesn’t reach the handlebar before the bike stops.
- Ride at a moderate speed and gently apply the brakes to see if the bike slows down smoothly and predictably.
If you notice any issues like delayed stopping or uneven pad contact, it’s time to make some adjustments. Proper brake response is crucial for safe riding, so take your time to check everything before heading out.
Fine-Tune Brake Pads
Once you’ve checked your brake response, it’s time to fine-tune the brake pads to ensure they make the best contact with the rim. Start by loosening the brake pad bolts a little.
Next, position the pads so they sit evenly on the rim, touching fully without hitting the tire or hanging off the edge. Squeeze the brake lever gently to see how the pads contact the rim.
If they’re misaligned, adjust their position by sliding or nudging them until they contact the rim evenly. Then, tighten the bolts securely once you’re happy with the fit.
Check the brake lever feel—if it still feels spongy or too tight, readjust the pad position or cable tension. Properly aligned brake pads help you brake smoothly and reduce wear, keeping your rides safe and efficient.
Replace or Lubricate Brake Cables if Needed
If your brake lever feels loose or requires too much effort to engage, it’s time to check the brake cables. First, look for fraying or corrosion along the cable and housing.
Next, see if the cable moves smoothly when you pull the lever. If it sticks, adding some lubrication might help.
If the cable is damaged or rusted, replace it with a proper fit to ensure good performance.
If the cable is in good shape but stiff, try applying a light lubricant inside the housing. Move the cable back and forth to spread the lubricant evenly.
Proper maintenance keeps your brakes responsive and helps prevent unnecessary wear. After replacing or lubricating, remember to adjust the tension for the best braking performance.
Verify Brake Performance on a Test Ride
Before heading out for a ride, take a short test run to verify your brake performance. Find a quiet, flat area where you can safely test your brakes without traffic.
Gently squeeze the brake levers and check how quickly and smoothly the brakes respond. The brakes should engage firmly without excessive lever travel.
Confirm you can stop within a reasonable distance and feel confident in the stopping power. Make sure the brake pads aren’t rubbing against the rim or disc and that they engage evenly on both sides.
If you notice any slipping, sticking, or uneven braking, recheck your adjustments. Performing this quick test confirms your brakes are reliable and safe before you hit the road.
Maintain Your Brakes for Long-Term Performance
Regularly maintaining your bike’s brakes keeps them responsive and reliable over time. To ensure they perform well in the long run, focus on these key steps:
- Inspect Brake Pads: Check for wear and replace them if they’re worn down to the indicator line.
- Clean Components: Wipe brake pads and rims with a clean cloth to remove dirt and debris.
- Adjust Cable Tension: Make sure cables are tight enough for effective braking but not overly tight.
- Lubricate Moving Parts: Apply lubricant to brake pivots so they move smoothly.
Frequently Asked Questions
How Often Should I Check My Bike’s Brake System?
You should check your bike’s brake system at least once every few rides, especially before long or challenging rides. Regular inspections help spot wear or issues early, keeping you safe.
Look for frayed cables, worn brake pads, or loose components. After cleaning or a long ride, give your brakes a quick test.
Frequent checks keep your stopping power reliable and prevent sudden failures, so you stay safe on the road.
Can I Adjust Brakes Without Special Tools?
Yes, you can usually adjust your bike’s brakes without special tools. Most adjustments just involve loosening or tightening the brake cable with your hands or a basic Allen wrench.
For brake pad alignment, you can often do it by hand or with a simple screwdriver. But if the cables are rusted or parts are damaged, using the right tools will make the job easier and more effective.
What Signs Indicate My Brakes Need Replacement?
Like a knight sensing their armor’s weakness, you’ll notice your brakes needing replacement when they no longer stop your bike effectively. If the brake pads are worn down to the metal or if you hear squealing, it’s time for new ones.
You should also pay attention if you have to pull the brake lever all the way to the handlebar or if your bike takes longer to stop. These are clear signs you should replace your brakes promptly.
How Do Weather Conditions Affect Brake Adjustment?
Weather conditions can really impact your brake adjustment. When it’s wet or humid, brake pads and rims can become slippery, which reduces braking efficiency.
Cold temperatures cause metal parts to contract, which can loosen your brake components. On the other hand, heat from long rides or hot weather can make things expand and affect the tension.
It’s a good idea to check and readjust your brakes regularly after weather changes. That way, you can keep your brakes performing safely and at their best.
Is It Necessary to Lubricate Brake Components Regularly?
Yes, it’s important to lubricate brake components regularly to keep everything working smoothly. Applying lubricant to the brake pivots, cables, and lever hinges helps reduce friction and prevents rust.
Just be careful not to get lubricant on the brake pads or the braking surface. That can decrease your braking performance and isn’t safe.
Regular lubrication ensures your brakes respond quickly, last longer, and help make your rides safer and more enjoyable.
Conclusion
Taking the time to fine-tune your brakes guarantees your rides stay smooth and safe. With a little patience and care, you’ll keep your bike performing at its best, turning every journey into a delightful adventure.
Remember, a well-adjusted brake system is like a trusted companion—ready to support you whenever you need it. Regular maintenance of your brakes ensures you stay confident on every ride.
Stay on top of your brake adjustments, and you’ll enjoy countless miles of worry-free riding. Keeping your brakes in check makes every pedal stroke a moment of pure joy.