How to Wrap Road Bike Handlebars in 8 Easy Steps
Many road cyclists know the frustration of slipping handlebars or uneven tape that ruins a ride. You’re not alone—getting that perfect grip and comfort can be tricky, especially if you’re new to bike maintenance.
To wrap your road bike handlebars in eight easy steps, start by gathering quality tape and tools. Then remove old tape and clean the bars thoroughly.
Wrap the tape from the bar ends toward the stem with consistent tension, overlapping neatly. Cover brake lever hoods for comfort, secure everything with finishing tape and plugs, and trim excess for a clean look.
Test for comfort and adjust tightness to avoid bumps or slipping.
Keep following to uncover tips that make your wrap last longer.
Key Takeaways
- First, remove the old tape and give your handlebars a good clean. This helps the new tape stick properly and last longer.
- Start wrapping the tape from the bar ends and work your way toward the stem. Keep the tape overlapping by half its width and hold it with steady tension as you go.
- When you reach the brake lever hoods, wrap carefully around them. Overlap the tape slightly for extra cushioning and tuck the edges neatly underneath for a tidy look.
- Secure the end of the tape with finishing tape. Then, insert the handlebar plugs to give a clean, professional finish.
- Before you’re done, test the grip comfort. Adjust the tightness if needed and smooth out any bumps or gaps for a sleek, comfortable ride.
Grab Your Tools and Tape for Road Bike Handlebar Wrap
Gather everything you need before you start wrapping your road bike handlebars. You’ll want to pick a quality handlebar tape that offers comfort and a good grip—options include cork, foam, or synthetic materials depending on what you prefer.
Choose comfortable, grippy handlebar tape like cork, foam, or synthetic before wrapping your road bike handlebars.
Make sure to have scissors or a sharp blade on hand to cut the tape cleanly. Electrical tape or finishing tape is also useful for securing the ends once you’re finished wrapping.
Don’t forget a pair of small pliers or a flathead screwdriver to remove bar-end plugs if your bike has them. Having a clean rag nearby helps keep your hands and handlebars tidy during the process.
Setting up your workspace with good lighting and a stable bike stand will make wrapping easier and more accurate. With these tools and materials ready, you’re all set for a smooth handlebar wrap.
Remove Old Tape and Clean Your Road Bike Handlebars
Start by peeling off the old handlebar tape carefully to avoid damaging the bars underneath. Take your time, especially around the curves and bends, so you don’t scratch or dent the handlebars.
Once the tape is removed, you’ll likely find leftover adhesive and dirt on the surface. Use a clean rag soaked in rubbing alcohol or a mild degreaser to wipe down the entire handlebar thoroughly.
This step is essential because any residue can prevent the new tape from sticking properly. Confirm you clean every corner, including the drops and the tops.
After cleaning, let the handlebars dry completely before moving on. A clean, residue-free surface guarantees your new wrap will stick well and last longer.
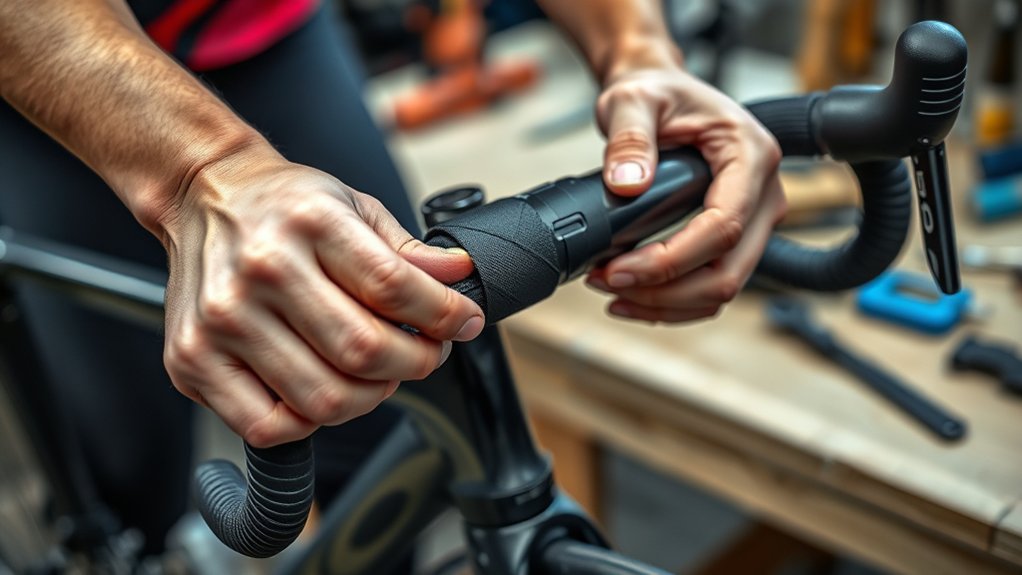
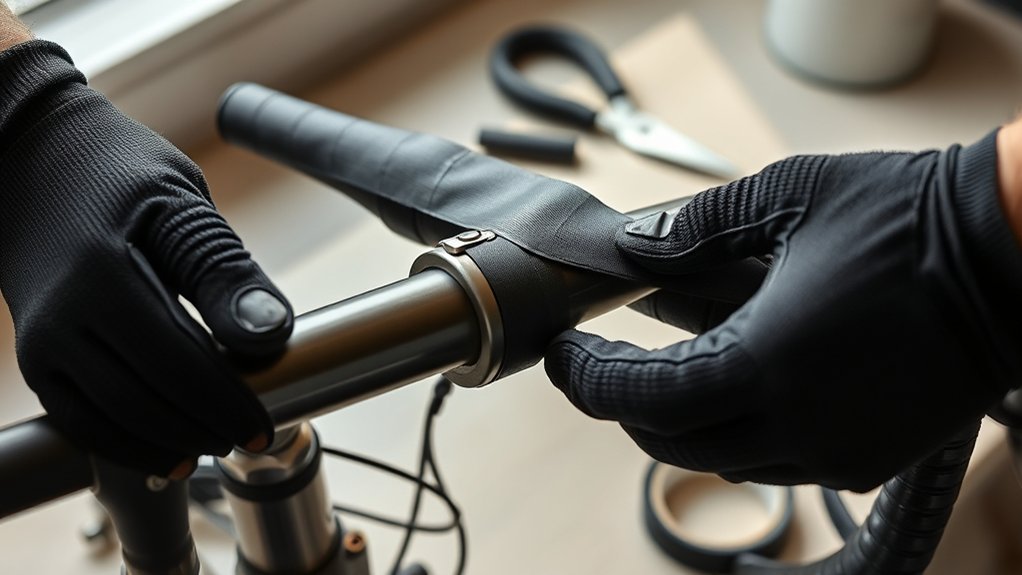
Wrap Road Bike Handlebars From Bar Ends to Stem
With your handlebars clean and dry, now you can start wrapping from the bar ends toward the stem. Begin by securing the tape’s adhesive side at the bar end, leaving a small overhang to tuck inside later. Wrap tightly and evenly, overlapping about half the width of the tape with each turn.
Keep tension consistent to avoid wrinkles or gaps. When you reach the brake levers, make a figure-eight pattern around the clamp to ensure full coverage and a smooth shift. Continue wrapping up the handlebar, maintaining the same overlap and tension.
As you get close to the stem, finish with a clean cut and secure the tape with electrical tape or the included adhesive strip. Tucking the tape end inside the bar end gives a neat, professional look.
Wrap Brake Lever Hoods for Extra Comfort
Wrapping your brake lever hoods can boost comfort during long rides by reducing pressure on your hands.
You’ll want to pick materials that feel soft yet durable to keep things cozy and secure.
Let’s look at how to wrap them properly for the best fit and feel.
Benefits of Brake Hoods
Although brake hoods might seem like a small detail, they make a big difference in your ride’s comfort. When you wrap your brake hoods properly, you create a cushioned grip that reduces hand fatigue on long rides.
They provide extra padding where you naturally rest your hands, helping absorb road vibrations and shocks. This added comfort means you can maintain better control and confidence, especially during climbs or sprints.
Brake hoods also improve your grip, preventing slippage even when your hands get sweaty or in wet conditions. Plus, a well-wrapped hood elevates the overall look of your handlebars, giving your bike a clean, polished appearance.
Taking the time to wrap your brake hoods right is a simple upgrade that pays off every time you ride.
Choosing Comfortable Materials
Selecting the right materials for your brake lever hoods can really improve your riding comfort. Wrapping these hoods with good-quality material helps reduce hand fatigue and gives you a better grip during long rides.
When choosing, think about options like silicone, foam, and rubberized synthetic materials. Silicone offers great cushioning and grip, especially in wet conditions, so your hands are less likely to slip. Foam is lightweight and soft, making it comfortable for extended periods and good at absorbing shocks.
Rubberized synthetic hoods are durable and water-resistant. They keep your grip solid and stand up well to wear and tear. Picking a material that matches your riding style and weather conditions will make sure your brake hoods feel comfortable and responsive every time you hit the road.
Proper Wrapping Techniques
If you want to make your riding more comfortable, it’s important to learn the right way to wrap brake lever hoods. Start by sticking the tape just below the hood, making sure it’s snug but not too tight.
As you wrap around the hood, overlap the tape a little to add cushioning and stop it from slipping. When you’re done, tuck the tape neatly under the edge of the hood for a smooth look.
This method improves your grip and cuts down on hand pressure, making long rides more enjoyable.
| Step | Action | Feeling Achieved |
|---|---|---|
| 1 | Start below hood | Secure and stable |
| 2 | Overlap tape | Cushioned and firm |
| 3 | Wrap evenly | Balanced comfort |
| 4 | Tuck tape neatly | Smooth and clean |
| 5 | Check tightness | Confident grip |
Secure Road Bike Handlebar Tape With Finishing Tape and Plugs
Finish your road bike handlebar wrap by securely fastening the tape’s end with finishing tape. This keeps the wrap tight and prevents it from unraveling during rides. Once the tape’s end is secured, insert the handlebar plugs into the open ends of your bars for a clean, safe finish.
Follow these simple steps to get it right:
- Wrap the finishing tape tightly around the last inch of tape, overlapping slightly to lock it in place.
- Press the tape firmly to make sure it sticks well and doesn’t come loose.
- Push the handlebar plugs into the bar ends until they fit snugly, sealing off the tape edges and protecting the bars.
This finishing touch not only looks better but also makes your handlebars more durable.
Trim Excess Tape for a Clean, Professional Look
Now that your tape is secure, it’s time to trim the excess for a clean finish.
Make sure you leave just enough tape to fold over the ends neatly without bulk.
Using sharp scissors and steady hands will help you achieve a professional look.
Proper Tape Length
Proper tape length is key to getting a clean, professional look on your handlebars. Too much tape makes bulky, uneven layers, while too little leaves parts exposed and unprotected.
To get it just right, follow these tips:
- Measure your handlebars first, considering the drops and bends to estimate how much tape you’ll need.
- Start wrapping at the ends, leaving about an inch of tape to fold inside the bar ends for a secure finish.
- When you reach the brake levers, overlap the tape slightly to avoid gaps but don’t layer too much, which can cause bumps.
Neat Finishing Techniques
Once you’ve wrapped your handlebars smoothly, trimming the excess tape is key to getting a clean, professional look. Use sharp scissors or a utility knife to cut the tape at an angle where the handlebar curves toward the stem.
This helps the tape lay flat and avoids bulkiness. Be careful to leave enough tape to secure with finishing tape or electrical tape. After trimming, wrap a few tight turns of finishing tape over the end to lock everything in place.
Press the finishing tape firmly so it sticks well and won’t unravel. Finally, tuck any loose tape edges neatly under the finishing tape for a tidy, polished appearance. These small steps make sure your handlebars look neat and stay wrapped securely during rides.
Test Your Road Bike Handlebar Grip and Adjust as Needed
Test your road bike handlebar grip by wrapping your hands around the bars and checking for comfort and control. If it feels slippery or uneven, you’ll want to make some adjustments. Here’s how to fine-tune your grip:
- Check for tightness: Make sure the tape is snug but not too tight, as that can cause discomfort.
- Feel for bumps or gaps: Smooth out any uneven spots by gently pressing or repositioning the tape.
- Verify the finishing tape: Ensure the end tape is secure so it doesn’t unravel during your rides.
Taking these small steps helps improve handling and makes your ride more comfortable. Once you’re happy with your grip, you’re all set to hit the road confidently.
Troubleshoot Common Road Bike Handlebar Wrapping Issues
Anyone wrapping road bike handlebars can run into a few common issues that affect comfort and durability. If your tape feels loose or unwraps quickly, make sure you’re pulling it tight as you wrap.
Uneven overlaps can cause bumps—keep each layer consistent and smooth. Watch for exposed handlebar sections, which reduce grip and protection; overlap tape edges properly to avoid these gaps.
If the end plugs don’t fit snugly, trim the tape end cleanly and wrap firmly to secure them. Finally, if the bar tape feels too thick or bulky, try thinner tape or adjust overlapping tension.
Frequently Asked Questions
What Type of Handlebar Tape Is Best for Different Weather Conditions?
For wet or rainy conditions, you’ll want a waterproof, grippy tape like cork or synthetic leather with a tacky finish. This helps keep your hands from slipping when things get wet.
In hot, dry weather, breathable tapes with moisture-wicking properties, such as microfiber or gel-infused tape, work best to keep you comfortable.
If you ride in cold weather, thicker, cushioned tape helps absorb road vibrations and keeps your hands warmer.
Choose your handlebar tape based on your climate and riding style for the best grip and comfort.
How Often Should I Replace My Road Bike Handlebar Tape?
You should replace your road bike handlebar tape every 3 to 6 months, depending on how often you ride and the conditions you face.
If you notice wear, loss of grip, or dirt buildup that doesn’t come off, it’s time for a change.
Riding in wet or sweaty conditions might mean replacing it more often.
Keeping fresh tape guarantees comfort and better control while you ride.
Can Handlebar Tape Improve My Grip During Long Rides?
Yes, handlebar tape can definitely improve your grip during long rides. It gives you extra cushioning and helps absorb sweat, so your hands don’t slip.
Choosing a tape with a tacky texture or added padding makes your hold more secure and comfortable. Over time, replacing worn tape helps you keep that grip and comfort.
This reduces hand fatigue and lets you focus fully on your ride.
Are There Any Health Benefits to Wrapping Handlebars Properly?
Did you know that improper handlebar grip can increase wrist pressure by up to 40%? Wrapping your handlebars properly definitely offers health benefits.
It reduces hand numbness and wrist strain by providing better cushioning and grip. This means you’ll avoid discomfort and potential nerve damage during long rides.
Plus, a secure wrap helps you maintain control, lowering the risk of accidents that could cause injuries. So, it’s worth doing it right!
How Do I Choose the Right Color or Style of Handlebar Tape?
You should pick handlebar tape color and style based on your bike’s look, personal taste, and visibility needs. If you want your bike to stand out, go for bright or contrasting colors.
For a classic or sleek look, choose black, white, or neutral tones.
Consider the tape’s material and texture too, since comfort matters on long rides.
Ultimately, pick what makes you happy and confident every time you ride.
Conclusion
Now that you’ve wrapped your road bike handlebars, you might wonder if it really makes a difference. The truth is, properly wrapped tape improves grip, comfort, and control, especially on long rides.
It’s not just about looks—good wrapping reduces hand fatigue and vibration. So, by following these steps, you’re not only upgrading your bike’s style but also enhancing your riding experience.
Give it a try and feel the difference yourself. Wrapping your road bike handlebars properly can make your rides more comfortable and enjoyable.